
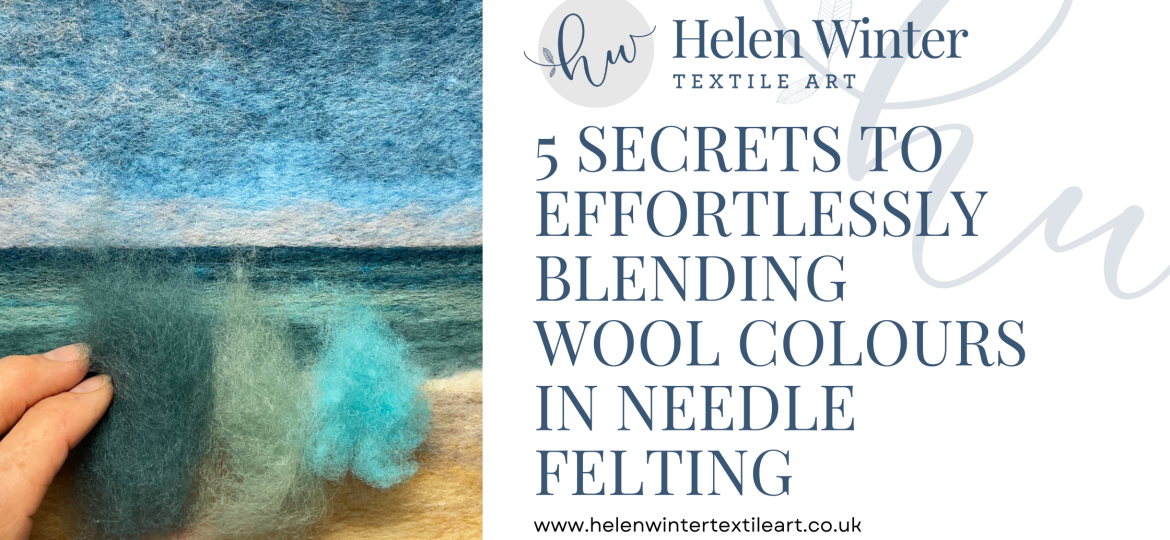
Blending wool colours in needle felting is a key technique for creating realistic, vibrant, and textured artwork. Whether you’re replicating subtle sky gradients or the rich tones of an animal’s fur, learning how to blend wool fibres, by hand, with brushes, or carders, helps you achieve custom colours, soft transitions, and natural depth. This step-by-step guide covers everything from basic blending methods to advanced tips for layering, creating gradients, and adding dimension to your needle felted pieces.
But before we get started why not download my FREE guide to Blending and Creating Your Own Wool Colours; a perfect resource for when you need just the right hue for your masterpiece.

Blending wool colours in needle felting isn’t just a technique; it’s an art form that can dramatically enhance the realism and emotional depth of any needle felted artwork. Whether you’re trying to capture the subtle shades of a sunset or the vibrant hues of a flower field, understanding how to blend wool effectively is essential. In this blog, I’ll walk you through the step-by-step process of blending wool colours, explain why blending is crucial, and show you how to use your custom blends to breathe life into your creations.
Introduction For Why Blend Wool Colours?
Before diving into the how-to, let’s discuss why blending colours is so vital in needle felting, everything you need to know about blending wool effectively, why it’s beneficial, and how you can use it to elevate your needle-felting projects
It’s all about adding depth, dimension, and realism to your work. Here are some key reasons why blending is essential in needle felting:
1. Create Unique Colours: Sometimes, you need a shade that doesn’t exist in commercially available wool. Mixing two or more colours gives you endless possibilities.
2. Achieve Smooth Transitions: Blended wool helps create soft gradients, such as the shift from light to dark in a sky or the natural blending of earth tones in a landscape.
3. Add Depth & Texture: Pure wool colours can look flat. Mixing shades together creates visual interest and a more organic appearance.
4. Enhance Textural Nuances: Blended fibres can introduce subtle textural variations that enrich the tactile quality of your work, making it more engaging to the touch and the eye.
5. Match Reference Images: When working from a photo, it’s rare to find the exact shade you need. Blending allows you to customize the wool to match your reference.
6. Save Money: Instead of purchasing multiple shades, you can blend what you have to create new tones without buying more supplies.
Blending different colours of wool is a game-changer when it comes to creating realistic needle-felted art. Whether you need a subtle gradient for a sunset sky, a natural variation in a pet portrait, or a unique colour that isn’t readily available, blending wool allows you to achieve custom shades and smooth transitions.

Secret #1: Hand Blending for a Natural Mix
The simplest way to blend wool is by hand. This method is ideal for small projects or when you need a subtle colour shift.
Step-by-Step Guide to Blending Wool Colours in Needle Felting
Now, let’s walk through the process of blending wool fibres effectively.
Step 1: Choose Your Colours
Select the colours you need to blend. If you’re aiming for a specific shade or gradient, consider the base tones and how they might mix. It’s often helpful to use a colour wheel as a guide to predict how different colours will interact.
Step 2: Blending By Hand:
1. Take small amounts of two or more colours of wool.
2. Place one colour on top of the other.
3. Pull apart the fibres gently.
4. Re-stack them in a different order.
5. Repeat pulling apart and re-stacking until the colours are evenly mixed.
6. Lightly fluff the wool to keep the fibres loose and airy before felting.

💡 Tip: The more times you repeat the pulling and re-stacking process, the more uniform the blend will be.
Step 3: Blending With Dog Brushes (Carding)
Secret #2: Using Blending Brushes for a Fine Mix
Blending brushes (or two dog slicker brushes) help create an even more refined mix, ensuring that the fibres are fully integrated for a smooth, consistent colour.
Step-by-Step Blending with Brushes:
1. Take two dog brushes or blending brushes.
2. Add small amounts of each colour onto one brush.
3. Hold the other brush in your opposite hand.
4. Gently brush the wool back and forth between the two brushes.
5. Continue until the fibres are thoroughly blended.

💡 Tip: This method is great for fine details, such as soft gradients in skies or subtle variations in animal fur.
Step 4: Check the Blend
Periodically check the blend to see if the colour meets your expectations. Adjust the proportions as needed. This step might require a bit of trial and error to get the perfect shade.
Secret #3: Layering for Gradient Effects
Instead of fully blending wool, sometimes you want a gradual transition. Layering is an excellent technique for creating soft gradients, such as sunsets or ocean waves.
Step-by-Step Gradient Layering:
1. Take two or more colours of wool and place them next to each other.
2. Overlap the edges slightly to create a transition zone.
3. Use your felting needle to gently poke at the overlap, blending the colours where they meet.
4. Continue layering and felting until you achieve the desired effect.
💡 Tip: For an ultra-soft gradient, use a fine-gauge needle and felt lightly to avoid harsh lines.
Secret #4: Carding for Large Batches
If you need a large amount of blended wool, using wool carders (or a drum carder) is the most efficient way to mix colours.
Step-by-Step Carding Method:
1. Place a layer of wool onto a hand carder.
2. Add the second colour on top.
3. Use the second carder to brush the wool in overlapping strokes.
4. Continue carding until the colours are fully mixed.
5. Remove the wool and pull it apart to check for consistency.
💡 Tip: This method is ideal for making blended wool in bulk for large backgrounds or consistent colour usage.
Secret #5: Creating Depth with Multiple Tones
For a natural, realistic look, use multiple shades rather than a single blend. For example, grass isn’t just one shade of green—there are hints of yellow, brown, and blue.
How to Add Depth with Blending Wool Colours In Needle Felting:
1. Blend two base colours together (e.g., green and yellow for grass).
2. Keep some strands of the original colours separate for variety.
3. When felting, randomly mix in small amounts of the different tones.
4. Layer darker shades for shadows and lighter tones for highlights.
💡 Tip: This technique is great for landscapes where natural colour variation makes a piece feel more lifelike.
Step 6: How to Use Blended Wool in Needle Felting
To use your blended wool in a project, gently felt it using your needle. The felting process will further integrate the colours and lock the fibres in place, ensuring the blend is stable and uniform throughout your piece.
Here’s how you can use it:
• Skies: Use soft gradients to mimic realistic sunsets, clouds, or stormy atmospheres.
• Water: Mix blues, greens, and white for oceans, lakes, and rivers with depth and movement.
• Grass & Foliage: Layer blended greens and yellows to create natural textures.
• Animal Fur: Combine multiple shades of brown, grey, or white for realistic fur effects.
• Shadows & Highlights: Use subtle variations of colour to add realism and depth to your landscapes.

5 Further Secrets for Perfect Colour Blends
To elevate your blending technique, keep these secrets in mind:
1. Use Complementary Colours Sparingly: Mixing colours that are opposite on the colour wheel can muddy your blend. Use these mixes carefully to maintain vibrant colours.
2. Test Small Batches: Before committing to a large blend, test small amounts to ensure the colour aligns with your vision.
3. Keep Your Brushes Clean: Regularly clean your carding brushes to prevent unwanted colour mixing and to maintain the integrity of your blends.
4. Utilise Layering: Sometimes, the best blend comes from layering colours during the felting process rather than mixing the fibres beforehand.
5. Embrace Variation: Part of the beauty of hand-blended wool is the slight variations it creates, adding a unique character to each piece.
How to Use Blended Wool in Needle Felted Landscapes
Blended wool can be used in a variety of ways in needle felting landscapes:
• Sky and Water: Create realistic skies and bodies of water by using gradients of blue, purple, and pink.
• Mountains and Fields: Use blends of green, brown, and grey to mimic the diverse textures and colours of natural landscapes.
• Flora and Fauna: Custom blends can help you achieve the precise colours of flowers, trees, and animals, making your scenes come alive.
Blending colours in needle felting opens up a world of creative possibilities. With practice, you can master this technique and see your landscapes transform into vibrant, lifelike creations that captivate and inspire. Whether you’re a beginner or a seasoned felter, remember that each piece is a learning experience and an opportunity to refine your artistic voice.
Create Beautiful Needle Felted Landscapes Book
If you’ve ever wanted to create stunning needle-felted landscapes but weren’t sure where to start, my book Create Beautiful Needle Felted Landscapes is the perfect guide for you! This book is packed with step-by-step instructions, expert tips, and six gorgeous projects designed to help you master the art of landscape felting.
Whether you’re a complete beginner or a seasoned needle felter looking to refine your techniques, you’ll find inspiration, guidance, and plenty of practical advice to bring your wool paintings to life. With a focus on texture, depth, and colour, this book will help you transform simple fibres into breath-taking natural scenes.


📖 Create Beautiful Needle Felted Landscapes is now available on Amazon (if you have issues accessing the book, please search for it in your own countries Amazon domain site) . Order your copy today and start your next creative adventure.
Final Thoughts on Blending Wool Colours In Needle Felting
Blending colours in needle felting is an essential skill that can transform your projects from basic to breath-taking. Whether you use hand blending, brushes, layering, or carding, each technique has its advantages. Experiment with different methods and see what works best for your style.
What will you blend first? Try these techniques in your next project and see the difference in depth and realism!
Blending your own colours is a really useful skill to master and helps to elevate your needle felting projects and by following this step-by-step guide you can watch your wool fibres transform into a breath-taking masterpiece.
You might be interested in learning more from me; I have more online tutorials that’ll take you through various step by step processes which will enhance your skill which you can find here.
Remember to experiment, embrace mistakes as learning opportunities, and above all, enjoy the process of bringing your needle felted art to life and don’t forget to download my FREE Blending and Creating Your Own Wool Colours Here
